
 I
didn't do anything with the engine for nearly 2 months when i first got
it, I spent a lot of time trying to work out the wiring diagrams and how
to fit it in the 205 with out having to tilt it too much. I booked a week
off work and started to dismantle the 1.6 with allot of help from my Dad.
After a day the engine bay in my 205 was empty. The bumper, valance and
radiator was removed so that the crane would be able to lift the engine
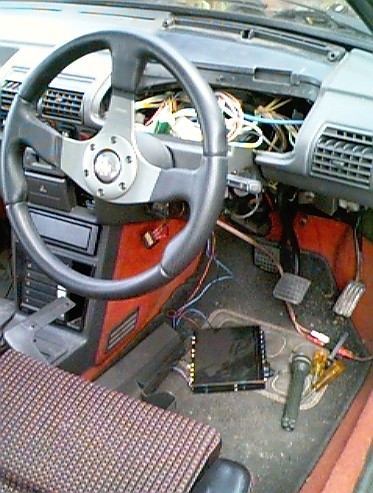
upwards through the engine bay. The drivers side of the dashboard was
also stripped down so the wiring loom would come out in one piece still
attached to the engine. The only bit of trouble that we had was the bumper
bolts inside the wheel arch were rusted into one lump and after 1 hour
of tightening and un-tightening decided to snap. Also the 406 engine
comes with a fixed position alternator and an adjuster wheel which slackens
or tightens the belts. I didnt like this so I took the adjuster off the
1.6 engine, cut it 1/4 of the way along so I had a mounting piece and
a adjusting
I
didn't do anything with the engine for nearly 2 months when i first got
it, I spent a lot of time trying to work out the wiring diagrams and how
to fit it in the 205 with out having to tilt it too much. I booked a week
off work and started to dismantle the 1.6 with allot of help from my Dad.
After a day the engine bay in my 205 was empty. The bumper, valance and
radiator was removed so that the crane would be able to lift the engine
upwards through the engine bay. The drivers side of the dashboard was
also stripped down so the wiring loom would come out in one piece still
attached to the engine. The only bit of trouble that we had was the bumper
bolts inside the wheel arch were rusted into one lump and after 1 hour
of tightening and un-tightening decided to snap. Also the 406 engine
comes with a fixed position alternator and an adjuster wheel which slackens
or tightens the belts. I didnt like this so I took the adjuster off the
1.6 engine, cut it 1/4 of the way along so I had a mounting piece and
a adjusting 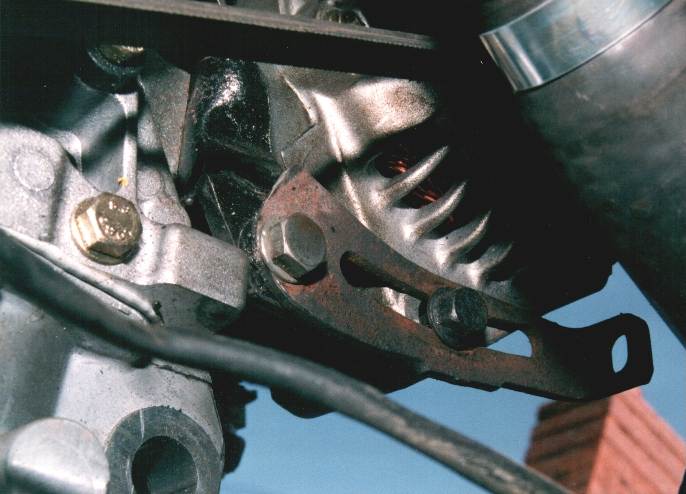 piece.
Then welded a 1" square piece to the mounting to extend it downwards.
In this extension a hole was made and the adjuster was attached. The alternator
lost its bottom mounting point and we out the new adjuster in its place.
Have a look at the pic on the left to see what I mean.
piece.
Then welded a 1" square piece to the mounting to extend it downwards.
In this extension a hole was made and the adjuster was attached. The alternator
lost its bottom mounting point and we out the new adjuster in its place.
Have a look at the pic on the left to see what I mean.
The
next thing we did was trial fit the 406 engine in the engine bay. It went
in using the 306 mount and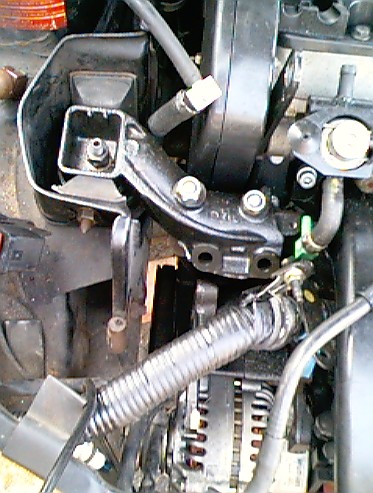 the other 2 mounts lined up ok. The two main problems where that the brake
servo was being pushed up nearly 1.5" and the radiator would not
fit in its original position because of the inlet manifold. Out
came the engine again and we began to swap the gearbox's over so the original
1.6 box would be used with the 406 engine. This also meant the flywheel
sensor had to be made fit. It goes on the top of the gearbox where there
is a teardrop shape casting which wasn't machined in production. I tapped
a thread into the smaller hole and then had to use a hand file to remove
around 1.5mm of aluminum around the edge of the large hole to fit the
sensor into. The hole had to be square so as to keep the sensor in the
middle of the flywheel. It took bloody hours but eventually it fitted
nice. We put the gearbox onto the engine using the 406 clutch and the
205 release bearing and bolted it up again.
the other 2 mounts lined up ok. The two main problems where that the brake
servo was being pushed up nearly 1.5" and the radiator would not
fit in its original position because of the inlet manifold. Out
came the engine again and we began to swap the gearbox's over so the original
1.6 box would be used with the 406 engine. This also meant the flywheel
sensor had to be made fit. It goes on the top of the gearbox where there
is a teardrop shape casting which wasn't machined in production. I tapped
a thread into the smaller hole and then had to use a hand file to remove
around 1.5mm of aluminum around the edge of the large hole to fit the
sensor into. The hole had to be square so as to keep the sensor in the
middle of the flywheel. It took bloody hours but eventually it fitted
nice. We put the gearbox onto the engine using the 406 clutch and the
205 release bearing and bolted it up again.
Out came the drivers side engine mount next to be cut down. My Dad pulled the shaft out of the rubber as it is only glued in and cut 1" off the top of the mount. The shaping had been lost a bit so he heated the shaft with a blow torch placed it into the mount and squashed it in the vice for an hour or so until it had cooled down. Once cold it was glued with an epoxy resin and left set in the vice until the next day.
 In
the mean time I was working on moving the radiator out the way of the
manifold. I didn't want to drop i
In
the mean time I was working on moving the radiator out the way of the
manifold. I didn't want to drop i t
down behind the beam at the front because i've heard that with the bumper
and valence in place the car can start to overheat, I don't want that
as im planning on abusing the throttle pedal when done. So instead I made
two brackets out of angle iron to fit on the front of the car and stick
about 4.5" out further than where the radiator normally sits. A thick
tube was welded between the brackets and the lot attached to the front
of the car. I cut a hole in the front of the car so the hose for the bottom
of the radiator could be attached.
t
down behind the beam at the front because i've heard that with the bumper
and valence in place the car can start to overheat, I don't want that
as im planning on abusing the throttle pedal when done. So instead I made
two brackets out of angle iron to fit on the front of the car and stick
about 4.5" out further than where the radiator normally sits. A thick
tube was welded between the brackets and the lot attached to the front
of the car. I cut a hole in the front of the car so the hose for the bottom
of the radiator could be attached.
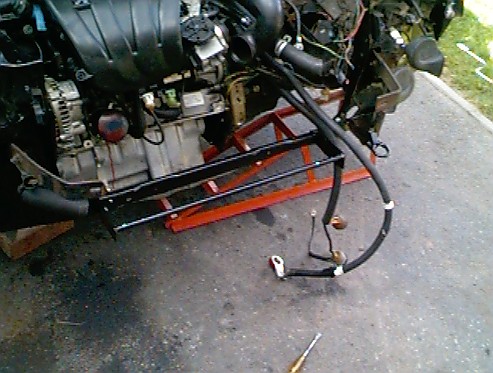
Got up early in the morning again which I was getting used to now :(. to start and put the engine in. The mount was released from the vice and was tested by doing a nut up to the correct torque, the shaft didn't move so we fitted the mount back on the car. Next up was to get the engine in and lined up on the mounts and also the exhaust downpipe. The engine was swung in and as it was lowered the exhaust downpipe bolts were lined up so we could see what angles needed cutting in the downpipe to make it fit. With all the three mounts tightened up the brake servo was just being missed by the rocker cover, and the gearbox linkages lined up ok. After looking under the car we saw that the downpipe only needed lifting less than 1" to make it fit the exhaust manifold so all was looking good.
The
slam panel which still had the radiator and cowling attached was rested
in place at the top and the cowling fitted to the new bottom mount. The
top hose that goes to the expansion tank fitted ok. The other that comes
from the 406 block needed cutting and stretching a little as it has a
dodgy connector on one end and a spring clip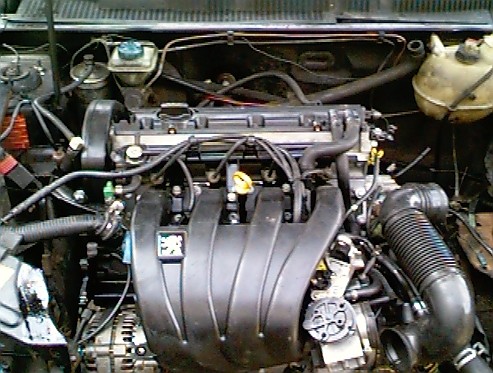 connector on the block end. At the bottom of the radiator the thermostat
was wired back up, and the bottom hose which now goes through the bodywork
was fitted onto a new metal hose which a guy at work gave me the day before
I knew mine had sprung a leak.
connector on the block end. At the bottom of the radiator the thermostat
was wired back up, and the bottom hose which now goes through the bodywork
was fitted onto a new metal hose which a guy at work gave me the day before
I knew mine had sprung a leak.
A
quick trim of the bumper because the cowling protrudes a little is all
that is needed for the mechanical side of the conversion, its just the
electrics which are left now to be wired up before the car can be ran.